This guide walks through creating a deal from the first click through basic property details and loan configuration—including standard, land, and portfolio deals.
Creating a Deal
The video below shows the Create Deal flow: opening the modal, entering the property address, and landing on Deal Overview.
-
Open the Create Deal modal. Sign in to Lev. In the top navigation, click Create Deal. The deal wizard opens on the first step (property address).
-
Enter a name. You can use any name that you'd like.
-
Enter the property address. Type the street address and choose the correct match from the suggestions so Lev can pin the asset and pre-fill context where possible.
-
Create the deal. With a valid address selected, confirm in the modal—typically by clicking Create Deal again—to create the deal record.
-
Land on Deal Overview. Lev takes you to Deal Overview, the hub for this deal. From here you’ll complete property details, financials, and loan preferences using Suggested Next Steps and the deal workflow.
Complete Basic Deal Information
The video below continues from Deal Overview into Complete Basic Deal Information: reviewing the overview, opening the form, choosing asset type and subtype, and saving.
-
Review Deal Overview. Confirm you’re on the right deal and note Suggested Next Steps—you’ll use them to open tasks like Complete Basic Deal Information when you’re ready for property-level fields.
-
Open Complete Basic Deal Information. Start that step from Deal Overview. The Basic Deal Information dialog opens with fields for how the asset should be classified in Lev.
-
Select asset type. Choose the category that best matches the property—for example Multifamily, Office, Retail, Industrial, or Land. (Portfolio and other flows may surface additional options in the product.)
-
Select asset subtype. After you pick a type, choose the subtype that fits. The list depends on the asset type you selected.
-
Save and continue. Click Save & Next to move on to Deal Configuration (loan preferences).
Deal Configuration
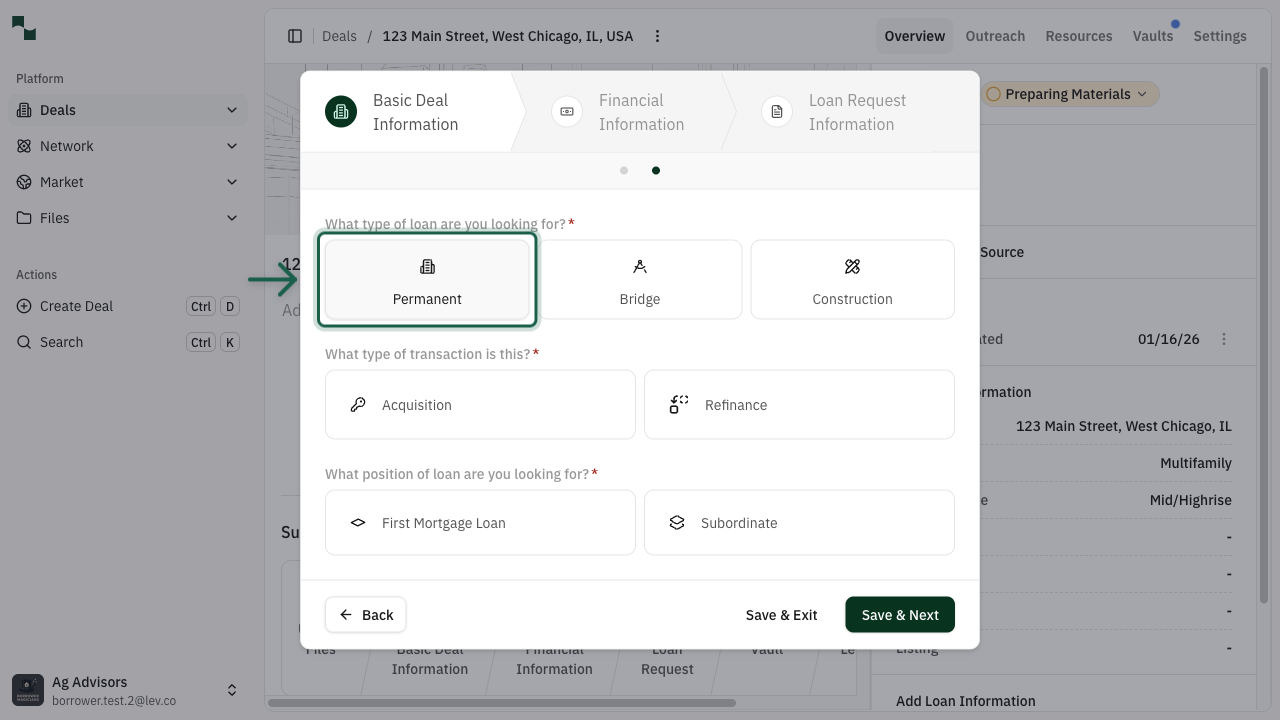
There isn’t a walkthrough video for this section yet; follow the steps below, then use the screenshot as a visual reference in the product.
-
Choose the loan product you need. Pick the option that matches what you’re raising—for example Permanent (long-term, often 5–30 years), Bridge (shorter-term, often ~1–3 years), or Construction (development or heavy value-add).
-
Choose the transaction type. Indicate whether this is an Acquisition (buying) or Refinance (replacing or restructuring existing debt).
-
Choose the loan position. Select First Mortgage Loan / Senior for primary debt, or Subordinate / Mezzanine if you’re describing junior debt.
There is no dedicated “mixed-use” asset type. Pick the type that reflects the largest share of income (for example Retail if retail drives more rent than multifamily). Explain the true mixed-use story in your lender outreach or memo so lenders aren’t misled.
Financial Information
After basic deal information and configuration are saved, add the numbers lenders use to size and rank the opportunity.
-
Open financial information. From Deal Overview, use the next step (e.g. Add Financial Information) to open the financial details form.
-
Enter the fields that apply. Examples include Purchase Price or Property Value, Project Costs (construction or renovation), PSA/LOI Expiration Date, In-Place Occupancy, Net Operating Income (NOI), and Required Equity commitment status.
-
Save and continue. Click Save & Next to proceed toward Loan Request and the rest of the launch workflow.
These inputs usually don’t change which lenders appear in suggestions, but they do affect how Lev ranks them internally. They also feed OM/Memo generation when you use Lev for marketing materials.